General Tab Settings
Only Admins have access to settings in Kapost.
The general settings for your Kapost instance include settings for:
- The Custom Branding setting is used to add your custom logo to your Kapost instance name.
- The Visibility setting allows all existing and newly created Ideas and Initiatives to be visible to any member of your instance.
-
- The Teams Notification setting allows admins to enable notifications on Microsoft Teams.
- The Custom Link setting allows you to add your own custom link(s), which will appear in the top navigation bar or within Insights, making them accessible to users.
- The Custom Support Link setting allows you to replace the support link that is visible to all members.
- The Custom Dashboard setting is used to enable 'Content for Review' section on dashboard.
- The About Page setting is used to enable the instance About Page, establish the information that will be displayed on this page, and add any attachments to be made available from this page.
Analytics
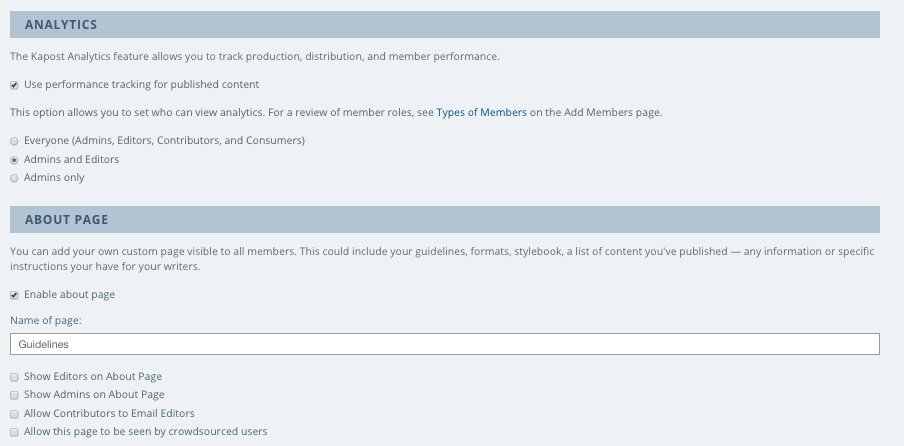
The Kapost Analytics feature must be enabled for production, distribution, and member performance data to be captured. Once analytics is enabled settings for access to the analytics, by role, need to be established.
Steps to enable Kapost analytics:
- From the left navigation menu, select General.
- Select the Use performance tracking for published content checkbox.
- Click Save Changes.
Steps to enable analytics access by role:
- From the left navigation menu, select General.
- Select the appropriate access option:
- Everyone (Admins, Editors, Contributors, and Consumers)
- Admins and Editors (default)
- Admins only
-
Select the Hide analytics on Content and Initiatives checkbox if you do not want to display the stats and analytics sections on Content and Initiatives.
- Click Save Changes.
Teams Notification Settings
To integrate with Microsoft Teams, please reach out to CSMs. Once integrated, admins can enable notifications in Microsoft Teams for all users.
To enable notifications, follow the steps below:
- From the left navigation menu, select
 > General.
 - Scroll down to Teams Notification Settings section.
- Select Enable notifications on Microsoft Teams checkbox.
- Click Save Changes.

To know more about different types of notifications, refer to Task Notifications and @mention Notifications.
Note: Users can customize notifications on Microsoft Teams for specific instance(s), refer to Teams Notification Settings.
Custom Support Link
Admins can configure the support link that is visible to all members. This link will appear in the ![]() button drop-down within the top navigation.
button drop-down within the top navigation.
- From the left navigation menu, select > General.
- Scroll down to Custom Support Link section.
- Select Enable custom support link checkbox.
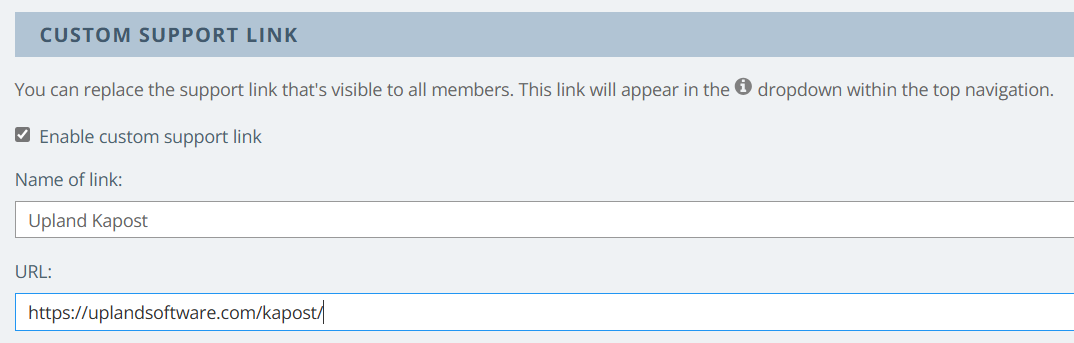
- Enter the name of the link and the URL under the respective fields.
- Click Save Changes. This displays the custom support link name within the
 button.
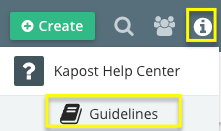
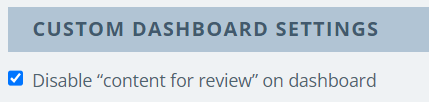
Custom Dashboard Settings
Admins can disable 'Collection Content For Review' section from displaying on the dashboard.
Note: This section is enabled by default.
- From the left navigation menu, select > General.
- Scroll down to Custom Dashboard Settings section.
- Select Disable “content for review” on dashboard checkbox.
- Click Save Changes.
About Page
The about page, used to provide customer specific information, must be enabled for user access. The default about page name is “Resources” but the name can be changed. Additional about page settings include are listed below. Beneath the additional page settings is a text box to capture the information to display on the about page. And beneath the text box is an option to add attachments that can be made available from the about page.
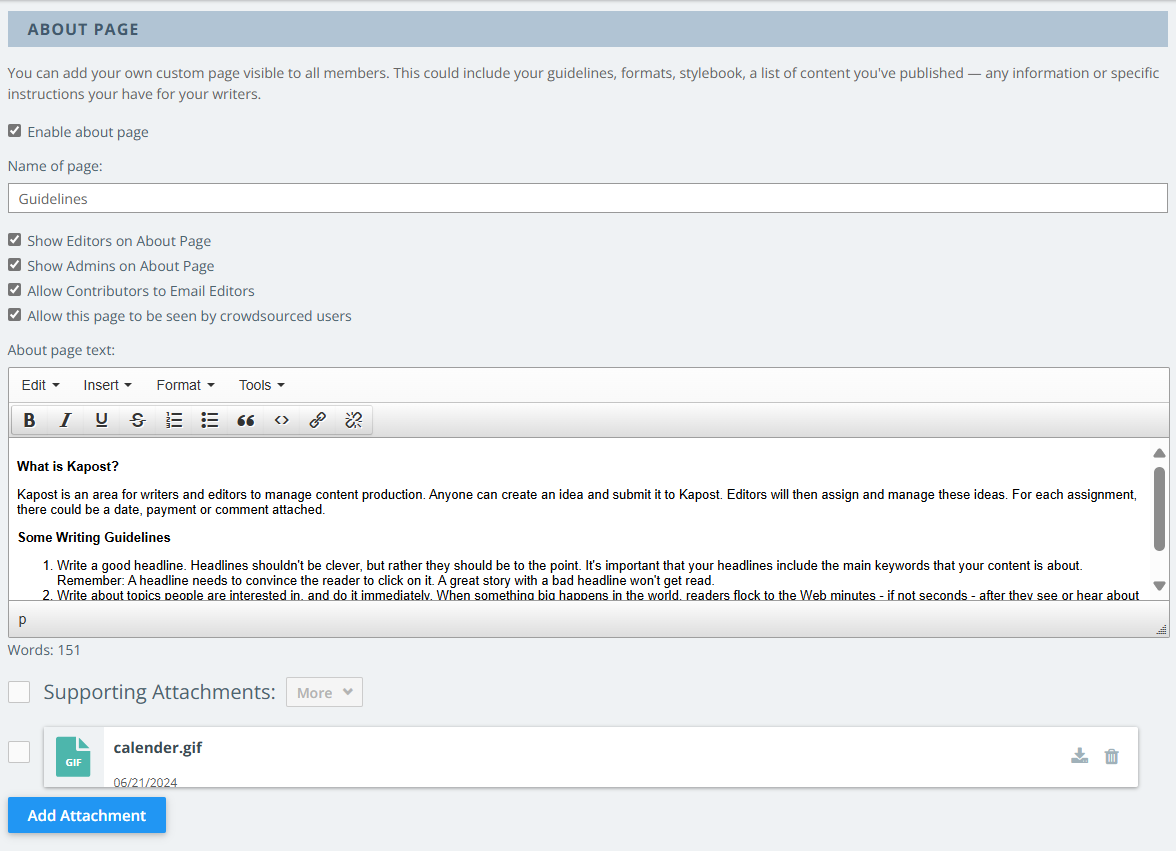
- Show Editors on About Page (Page will display all Editor’s profile pictures and hyperlinked name)
- Show Admins on About Page (Page will display all Admin’s profile pictures and hyperlinked name)
- Allow Contributors to Email Editors (Page will show button next to each admin or editor to allow you to contact them)
- Allow this page to be seen by crowdsourced users
Steps to enable the about page:
- From the left navigation menu, select General.
- Select the Enable about page checkbox.
- Click Save Changes.
Steps to rename the about page:
- From the left navigation menu, select General.
- Enter the desired name of the about page.
- Click Save Changes.
Steps to create the about page text:
- From the left navigation menu, select General.
- In the About page text section, enter the desired about page text.
- Click the Add Attachments button and specify the file(s) to be attached to the about page.
- Click Save Changes.
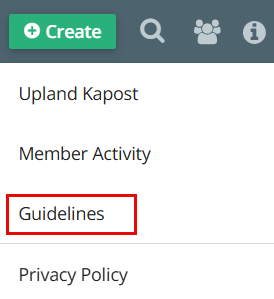
To get to the about page, click the![]() button at the top of your instance. Then click About or whatever name the Admin has given your about page in the instance. In the example image below the about page is called "Guidelines."
button at the top of your instance. Then click About or whatever name the Admin has given your about page in the instance. In the example image below the about page is called "Guidelines."